Shift Rehab
Jonathan Maszak

💪 Today's Session

Sunday 31 May 2026

💬 You have a new message from your clinician.
Stage 7 · Block 2 Adding Load
✅ Exercise Checklist
Choose Gym Flow or Home Mobility above to load exercises.
Completion
🌡️ Pain Level Today

Rate your pain right now (0 = no pain, 10 = worst imaginable)

No pain level selected

📝 Session Notes

📈 My Progress

Your session history

💬 Messages
No messages yet.
🏅 Achievements
Loading…
📊 Last 7 Sessions
Completion % Pain Level
🗂️ Session Log
📋

No sessions recorded yet.

▶️ Exercise Videos

Reference library for your exercises

Gym Flow
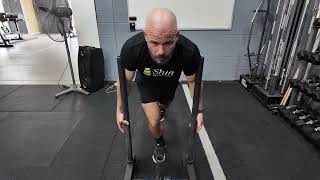
Sled walk
Warm-up · 5–10 min
How to perform
The sled walk is your warm-up and your workout in one. Load the sled light — we're training posture and gait, not max effort. Drive through your heel, keep your chest proud, and push from your hips — not your lower back. If your back arches or your shoulders round, lighten the load. This one conditions the posterior chain in a way that directly translates to how you walk every day. Keep the pace steady and controlled.
Trap-3 raises
Upper back · 2–4 × 10–15
How to perform
Lie face down — arms at roughly a Y position, thumbs pointing up. Lift your arms off the floor using only your shoulder blade muscles. Think about pulling your shoulder blades down and together before you raise — that's what activates the lower trapezius. This is a small movement. If you're heaving or shrugging your neck, you've lost it.
Thoracic extension
Thoracic mobility · 2 × 8 slow
How to perform
Place a foam roller on the floor perpendicular to your spine. Sit in front of it, then lower your mid-back down onto the roller — it should sit roughly at bra-strap level to start. Support your head with your hands interlaced behind your neck. From here, let your upper back extend back over the roller gently. Breathe in and allow the movement — do not force it. Hold for 2 to 3 seconds at the bottom, then return. After each set, reposition the roller one segment higher toward your shoulder blades. This is not a stretch to push hard — it is a gentle mobilisation. If you feel anything in your lower back, the roller has drifted too low.
Supine banded abduction
Glute med · 2–3 × 12–15 each side
How to perform
Lie on your back with your hips at 90 degrees — feet resting on a wall or bench, knees bent. Place a resistance band just above your knees. Keeping your pelvis flat and still, push one knee outward against the band. Hold for one second at the end range, then return with control. The working position — hips flexed to 90 degrees — pre-lengthens the posterior fibres of the glute medius, so you get more recruitment from the start. Do not let the opposite hip rotate or the lower back arch. Keep the movement clean and deliberate.
Standing banded abduction
Glute med · 3 × 12–20 each side
How to perform
Stand upright with a resistance band just above your knees. Hold a wall or upright for balance if needed. Keeping your pelvis level and your standing leg stable, lift one leg directly out to the side. Do not let your hip shift outward on the standing side — that is a compensation, not a rep. Pause at the top for one to two seconds, then return with control. The standing position challenges the glute medius in a more functional way than lying down — your standing-leg glute med has to work the whole time to keep your pelvis level.
Monster walk
Glute med · 3–4 × 10–15m
How to perform
Place a resistance band just above your knees. Get into a partial squat position — hips back, chest up, slight forward lean. From here, walk forward by taking small, controlled steps — keeping the band under tension throughout by never letting your feet come completely together. Your knees should track outward over your toes on every step. Walk 10 to 15 metres forward, then walk straight back in the same position. The glute medius fires on every step to prevent the stance-side hip from dropping — this is its primary functional job during gait, and exactly what you have been training for.
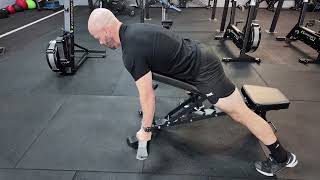
Banded row
Mid-back pull · 2–4 × 10–15
How to perform
Sit tall on the bench, band anchored at chest height in front of you. No back support — this is part of the exercise. Pull the band to your lower ribs, elbows tracking close to your body. Pause at the end, squeeze your shoulder blades together, then control it back. Keep your torso upright throughout.
Dowel hip hinge
Hip hinge pattern · 3 × 8–10
How to perform
Hold a dowel or broomstick along your spine — three points of contact: back of head, between shoulder blades, and tailbone. Hinge at the hips — push them back while maintaining all three contact points. Your back stays flat and rigid throughout. This is a pattern drill, not a strength exercise. If you lose contact at any point, you've moved your spine instead of your hips.
Good morning
Posterior chain · 3–4 × 10
How to perform
Bar on the upper back, feet hip-width apart, slight bend in the knees. Hinge at the hips — push them back, not your knees down. Your back stays flat — rigid. Lower until you feel a pull in your hamstrings, then drive your hips forward to return. This is a hip hinge pattern, not a squat. Form over weight, always.
Reverse hyper
Posterior chain · 3 × 10–15
How to perform
Lie face-down on a bench or platform so your hips are at the edge and your legs hang free. Hold the bench firmly with both hands. With control, swing your legs upward and back — feel the glutes and hamstrings activate as you lift. Lower slowly — allow the legs to swing forward slightly, which gently tractions the lumbar spine. The descent is therapeutic. Keep the movement smooth and controlled throughout — no jerking or momentum.
Sumo deadlift
Compound hip hinge · 3–4 × 5–8
How to perform
Wide stance, toes turned out, barbell between your legs. Hinge and grip the bar — arms straight inside your knees. Back flat, chest up, take the slack out of the bar before you pull. Drive your feet into the floor and push the floor away — the bar rises as your hips extend. Lock out at the top by squeezing your glutes.
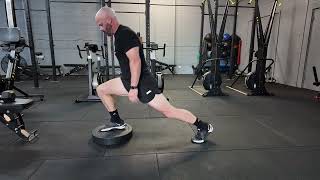
Split squat
Hip/quad · 2–4 × 8–12 per side
How to perform
Both feet on the ground in a split stance. Sink your back knee all the way to the floor, driving your front knee forward. Keep your torso upright and your heel flat. Start with bodyweight until the range is comfortable, then add load. Depth is the point.
Hip thrust
Glutes · 3 × 8–12 barbell
How to perform
Upper back on a bench, barbell across the hips — use a pad for comfort. Feet flat, knees bent. Drive your hips upward by squeezing your glutes — not your lower back. At the top, your body forms a straight line from knees to shoulders. Lower slowly and repeat.
Glute bridge
Glutes · 3 × 12–15 DB loaded
How to perform
Lie on your back, feet flat, knees bent. Place a dumbbell across your hips. Drive your hips up by squeezing your glutes — not your lower back. Hold at the top, then lower slowly. Keep your core braced and your hips level throughout.
Back ext. iso hold
Spinal erectors · iso holds → reps
How to perform
Position yourself in the back extension station so your hip crease is at the top of the pad. Cross your arms or place your hands behind your head. Lower your torso slowly, then raise it back to neutral — and hold. Your body should form a straight line from your head to your heels. Don't hyperextend at the top. Earn that hold.
Home Mobility
McGill curl-up
Deep stabilisers · 3–4 × 8–10 sec holds
How to perform
Lie on your back, one knee bent, one leg flat. Slide your hands under your lower back to maintain its natural curve. From here, lift only your head and shoulders off the ground — a small movement. Hold briefly, then lower. This is not a crunch. We're training the deep abdominal wall to brace and protect your spine, not flex it.
Bird dog
Spinal stability · 3 × 10 each, 8–10 sec holds
How to perform
On all fours — wrists under shoulders, knees under hips. Brace your core lightly, then extend one arm and the opposite leg simultaneously. Hold the position — your hips stay level, your lower back doesn't rotate or sag. Return slowly and repeat on the other side. Stability is the goal, not reach.
Dead bug
Core stability · 3 × 10 each side
How to perform
Lie on your back, arms pointing to the ceiling, hips and knees at ninety degrees. Press your lower back gently into the floor and keep it there throughout. Lower one arm overhead and the opposite leg toward the floor — slowly. Return and repeat on the other side. Don't rush it.
90-90 hip sit
Hip rotation · 2 × 30–75 sec
How to perform
Sit on the floor with both knees bent at ninety degrees — one in front, one to the side. Sit tall through both sit bones. Hold this position and breathe. Then rotate and switch sides. The goal is to sit upright without propping yourself up.
Deep squat hold
Ankle · hip · thoracic · 2–4 × 20–60 sec
How to perform
Feet shoulder-width apart, toes out slightly. Lower into a full squat and hold — heels flat on the floor if possible. If your heels lift, place a folded towel underneath them for now. Use your elbows to gently push your knees out, and breathe. Work toward thirty seconds. Gravity does the work, you just have to stay there.
Pigeon hold
Hip external rotation · holds + pulses
How to perform
From all fours, bring one shin forward and across — knee toward the opposite wrist. Extend the back leg straight. Lower your hips toward the floor and hold. You should feel a deep stretch in the outer hip of the front leg. Don't sink into your lower back to compensate.
Couch stretch
Hip flexor · quad · 2 × 30–90 sec
How to perform
Kneel facing away from a wall or couch. Place one foot up behind you — shin resting against the surface, knee near the base. Step the other foot forward into a lunge position. Brace your core, tuck your pelvis slightly, and hold upright. You should feel a deep stretch through the front of the rear hip and thigh.
Side bend progression
Lateral chain · 2–4 × 15–45 sec
How to perform
Stand tall, feet hip-width apart. Reach one arm overhead and bend slowly to the opposite side — long through the waist, no forward lean. Hold the end range, breathe into the side you're stretching, then return. Move slowly and stay in your pain-free range.
Cat-cow
Spinal mobility · 2–3 × 8–12 slow
How to perform
On all fours, wrists under shoulders, knees under hips. Start neutral. On the exhale, round your entire spine toward the ceiling. On the inhale, let your belly drop, lift your chest and tailbone. Move slowly between the two — this is controlled segmental movement, not a speed drill.
Hip flexor kick out
Hip flexor strength + mobility · 2–4 × 10–15
How to perform
Start in a half-kneeling position — one knee down, one foot forward. Tuck your pelvis under slightly to engage the stretch, then drive the back knee forward and up in a controlled kick. Return to the start. Keep the movement slow and deliberate, and maintain an upright torso throughout.
4-way hip mobility circuit
Hip all planes · full circuit
How to perform
This is four movements in sequence — forward swing, lateral swing, crossbody swing, and hip circle. Stand on one leg, hold a fixed surface lightly for balance. Each swing should be controlled — initiated from the hip, not momentum. Run through all four directions on one side before switching.
Loaded butterfly
Hip external rotation · 2–4 × 30–60 sec
How to perform
Sit on the floor, soles of feet together, knees dropping to the sides. Hold a light weight on your feet or press gently on your inner thighs. Sit tall — don't slump. Hold the position and breathe. Don't force the knees down — let the weight and gravity do it over thirty to sixty seconds.
Deep psoas hold
Deep hip flexor · 2 × 45–90 sec
How to perform
Take a long lunge position — back knee on the floor, front foot well forward. Tuck your pelvis under and hold. Don't lean forward into this stretch — stay tall or slightly back. Breathe deeply into the stretch. A minimum of forty-five seconds per side, every session.
Nerve floss
Neural mobility · 2–3 × 15–25 each
How to perform
Sit or stand tall. Extend one leg out in front of you with your foot flexed. From here, slowly extend the knee and dorsiflex the foot at the same time, then relax. You may feel a pulling sensation down the back of the leg — that's the sciatic nerve moving through its pathway. Move slowly and rhythmically — stop if you feel sharp symptoms.
Side bridge
Lateral chain · holds, Stage 1–12 progression
How to perform
Lie on your side with your elbow directly under your shoulder and your feet stacked. Lift your hips off the floor so your body forms a straight line from head to feet — no sagging at the waist, no rotation at the hips. Hold the position and breathe. If you cannot hold the full prescribed time, hold for as long as you can and rest, then repeat. Every second you hold is building the lateral chain that protects your lumbar spine.
Play the Long GameTissue Tolerance FirstTrain the Spine, Don't Protect ItFlare-Ups Are Feedback, Not Failure3/10 Effort Can Create ChangeYou Are Only As Strong As Your Weakest LinkConsistency Builds AdaptationNever Progress Until the Current Level Feels ComfortableEarn the Next StepPlay the Long GameTissue Tolerance FirstTrain the Spine, Don't Protect ItFlare-Ups Are Feedback, Not Failure3/10 Effort Can Create ChangeYou Are Only As Strong As Your Weakest LinkConsistency Builds AdaptationNever Progress Until the Current Level Feels ComfortableEarn the Next Step
📅 12
Stages Total
⚡ 5×
Per Stage
🏆 3
Blocks

Your Progress

Stage 7
Block 2
0 / 3
1
2
3
4
5
6
7
8
9
10
11
12
📈 Back Extension Progression
Your 5-stage roadmap — milestone based, not time based
1
Accumulate 2 Minutes Total
Hold at whatever interval is comfortable — 10 sec, 15 sec, 30 sec. Rest between holds. Keep accumulating until you reach 2 minutes of total hold time in the session. Work toward being able to hold the full 2 minutes continuously before moving to Stage 2.
🎯 Ready to progress when: 2 continuous minutes held comfortably in a single unbroken hold
2
Single Leg Holds
Lift one leg off the pad while holding the back extension position. Work up to holding 1 minute each side. Start with whatever you can manage — even 10 seconds per side is a win to start.
🎯 Ready to progress when: 1 min each side feels controlled and comfortable
3
Mid-Range Pulses
Begin moving through the mid-range only — small, controlled pulses from neutral to about 30° of flexion. Start with 8–10 reps. Build gradually until you can complete 30 continuous reps without discomfort.
🎯 Ready to progress when: 30 continuous mid-range reps feel smooth and painless
4
Full Range Movement
Now move through the full range of the machine — from full flexion to full extension. Start with 8–10 reps and build to 30 continuous reps. Control the movement in both directions.
🎯 Ready to progress when: 30 full-range reps feel strong and pain-free
5
Add Weight
Begin adding load — start light (2.5–5 kg). Work back up to 3 sets of 10–15 reps with added weight. Increase only when the current weight feels comfortable across all sets.
🎯 Goal: 3–5 × 10–15 at a working weight that challenges you without causing a flare

Move to the next stage only when the current one feels comfortable and controlled — not before. There is no rush.

🧭 Program Principles
The rules that protect your progress
🌱 Block 1
Sensitise & Orient
Stage 1
Finding Baseline Capacity
🏋️ ~26m   🏠 ~15m
← YOU ARE HERE
💬 Your ONLY job this stage is to discover your current capacity. If the back extension hold causes a flare, shorten to 5–10 seconds. Stay well below the pain line. There is no level too easy to start from.
🏋️ Gym Flow (3×/week)
Sled walk
5 min warm-up — light load
Trap-3 raises
2 × 10 light
Banded row
2 × 10 light
Supine banded abduction
2 × 12 each side — light band
Dowel hip hinge
3 × 8 — bodyweight
Back ext. iso hold
Stage 1 — accumulate 2 min total; start with comfortable intervals (e.g. 3 × 15–20 sec)
🧠 Home A — Stability (alternating)  ~15m
McGill curl-up
3 × 8 sec hold each side
Bird dog
2 × 6 each side, 8 sec holds
Dead bug
2 × 6 each side
Glute bridge
2 × 10, 3 sec hold at top
Side bridge
2 × 15s each side (or max hold)
🧘 Home B — Mobility (alternating)  ~9m
Cat-cow
2 × 10 slow
90-90 hip sit
2 × 30 sec per side
Couch stretch
2 × 30 sec per side
Stage 2
Building the Habit
🏋️ ~26m   🏠 ~15m
← YOU ARE HERE
💬 Measure your response after each session. Compare your pain score before vs after. This data is gold. Stay patient — adaptation is happening under the surface even when you can't feel it.
🏋️ Gym Flow (3×/week)
Sled walk
5 min warm-up — slightly more weight
Trap-3 raises
2–3 × 12
Banded row
2–3 × 12
Supine banded abduction
2 × 15 each side — light band
Dowel hip hinge
3 × 10 — pause at bottom
Back ext. iso hold
Stage 1 — accumulate 2 min total (e.g. 3–4 × 20–30 sec with rest)
🧠 Home A — Stability (alternating)  ~15m
McGill curl-up
3 × 10 sec hold each side
Bird dog
2 × 8 each side, 8 sec holds
Dead bug
2 × 8 each side
Glute bridge
3 × 12, 2 sec hold
Side bridge
2 × 20s each side (or max hold)
🧘 Home B — Mobility (alternating)  ~12m
Cat-cow
2 × 10 slow
90-90 hip sit
2 × 45 sec
Deep squat hold
2 × 20 sec
Couch stretch
2 × 40 sec
Stage 3
Adding Posterior Chain Depth
🏋️ ~30m   🏠 ~15m
← YOU ARE HERE
💬 This stage adds hip and posterior chain work. Introduce each new exercise gently. If anything causes a spike above your baseline pain, drop that exercise only — keep the rest of the flow going.
🏋️ Gym Flow (3×/week)
Sled walk
5 min warm-up — add a little more weight
Trap-3 raises
3 × 12
Banded row
3 × 12
Split squat
2–3 × 8 per side
Supine banded abduction
3 × 12 each side — stronger band
Dowel hip hinge
3 × 10 — slow eccentric
Back ext. iso hold
Stage 1 — accumulate 2 min total (e.g. 2–3 × 40–60 sec with shorter rest)
🧠 Home A — Stability (alternating)  ~15m
McGill curl-up
3 × 10 sec hold each side
Bird dog
3 × 8 each side, 8 sec holds
Dead bug
3 × 8 each side
Glute bridge
3 × 15, 2 sec hold
Side bridge
2 × 25s each side (or max hold)
🧘 Home B — Mobility (alternating)  ~15m
Cat-cow
2 × 10 slow
90-90 hip sit
2 × 45 sec
Deep squat hold
2 × 30 sec
Pigeon hold
2 × 30 sec per side
Couch stretch
2 × 45 sec
Stage 4
Solidifying Block 1 Foundation
🏋️ ~30m   🏠 ~15m
← YOU ARE HERE
💬 Take stock. Have you been able to hold 30 seconds comfortably on the back extension? Are the bird dog and dead bug feeling controlled? Stage 4 is a milestone — you have built a foundation. Block 2 is next.
🏋️ Gym Flow (3×/week)
Sled walk
5 min warm-up — comfortable working weight
Trap-3 raises
3 × 15
Banded row
3 × 15
Split squat
3 × 10 per side
Supine banded abduction
3 × 15 each side — stronger band
Dowel hip hinge
3 × 10 — add light load (2–5 kg)
Back ext. iso hold
Stage 1 — goal: single unbroken 2-minute hold
🧠 Home A — Stability (alternating)  ~15m
McGill curl-up
4 × 10 sec hold each side
Bird dog
3 × 10 each side, 8 sec holds
Dead bug
3 × 10 each side
Glute bridge
3 × 20, 2 sec hold
Side bridge
3 × 30s each side (or max hold)
🧘 Home B — Mobility (alternating)  ~12m
Cat-cow
2 × 10 slow
4-way hip mobility circuit
full circuit
Deep squat hold
2 × 45 sec
Couch stretch
2 × 50 sec
⚡ Block 2
Build & Strengthen
Stage 5
Loading the Posterior Chain
🏋️ ~30m   🏠 ~21m
← YOU ARE HERE
💬 Block 2 begins with two distinct session types — alternate A and B each gym day. Session A is your strength anchor: hip hinge, glute loading, back extension. Session B is your accessory work: upper back, single-leg, abduction. Each session is focused and deliberate.
💪 Session A — Strength (alternating)  ~18m
Sled walk
5 min warm-up — add weight from Block 1
Good morning
3 × 10 bodyweight
Glute bridge
3 × 15 — add DB on hips
Back ext. iso hold
Stage 1→2 — if 2-min continuous hold is comfortable, begin single leg holds (10–20 sec each side)
🎯 Session B — Accessory (alternating)  ~30m
Sled walk
5 min warm-up — add weight from Block 1
Trap-3 raises
3 × 15
Banded row
3 × 12 (stronger band)
Split squat
3 × 12 per side
Standing banded abduction
3 × 12 each side — light-moderate band
Thoracic extension
2 × 8 over foam roller — slow
Back ext. iso hold
Stage 1→2 — if 2-min continuous hold is comfortable, begin single leg holds (10–20 sec each side)
🧠 Home A — Stability (alternating)  ~15m
McGill curl-up
4 × 10 sec hold each side
Bird dog
3 × 10 each side, 8 sec holds
Dead bug
3 × 10 each side
Glute bridge
3 × 15, 2 sec hold
Side bridge
3 × 35s each side (or max hold)
🧘 Home B — Mobility (alternating)  ~21m
Cat-cow
2 × 10 slow
4-way hip mobility circuit
full circuit
Deep squat hold
3 × 45 sec
Loaded butterfly
2 × 30 sec
Hip flexor kick out
3 × 12 each side
Side bend progression
3 × 25 sec
Couch stretch
2 × 60 sec
Stage 6
Progressing the Hip Hinge
🏋️ ~30m   🏠 ~21m
← YOU ARE HERE
💬 The transition from iso holds to movement reps on the back extension is the most sensitive progression this stage. Change the LEAST amount of variables at once. Session A introduces the sumo deadlift — keep the load very light.
💪 Session A — Strength (alternating)  ~22m
Sled walk
5 min warm-up — moderate weight
Good morning
3 × 12 (add light load — bar or band)
Sumo deadlift
3 × 8 — kettlebell, light
Glute bridge
3 × 12 — heavier DB
Back ext. iso hold
Stage 2 — single leg holds, building toward 1 min each side
🎯 Session B — Accessory (alternating)  ~30m
Sled walk
5 min warm-up — moderate weight
Trap-3 raises
3 × 15
Banded row
3 × 15 (strong band)
Split squat
3 × 12
Standing banded abduction
3 × 15 each side — moderate band
Thoracic extension
2 × 8 over foam roller — slow
Back ext. iso hold
Stage 2 — single leg holds, building toward 1 min each side
🧠 Home A — Stability (alternating)  ~15m
McGill curl-up
4 × 10 sec hold each side
Bird dog
3 × 10 each side, 10 sec holds
Dead bug
3 × 10 each side
Glute bridge
3 × 15, 2 sec hold
Side bridge
3 × 40s each side (or max hold)
🧘 Home B — Mobility (alternating)  ~21m
Cat-cow
2 × 10 slow
4-way hip mobility circuit
full circuit
Deep squat hold
3 × 50 sec
Loaded butterfly
2 × 40 sec
Hip flexor kick out
3 × 12 each side
Side bend progression
3 × 30 sec
Couch stretch
2 × 60 sec
Stage 7
Adding Load
🏋️ ~30m   🏠 ~21m
← YOU ARE HERE
💬 Adding external load to the main hip hinge movements this stage. Monitor closely — if the loaded good morning causes a flare, drop back to bodyweight immediately. The weight is NOT the goal; the quality of stimulus is.
💪 Session A — Strength (alternating)  ~26m
Sled walk
5 min warm-up — add weight
Good morning
3 × 10 (moderate load)
Sumo deadlift
3 × 8 — heavier KB
Hip thrust
3 × 10 — barbell light
Monster walk
2 × 10m forward and back — light band
Back ext. iso hold
Stage 2 — single leg holds, building toward 1 min each side
🎯 Session B — Accessory (alternating)  ~30m
Sled walk
5 min warm-up — add weight
Trap-3 raises
3 × 15 (add band)
Banded row
4 × 12 (strong band)
Split squat
3 × 12 (add 5 kg)
Standing banded abduction
3 × 15 each side — moderate band, 2-sec hold
Thoracic extension
2 × 8 over foam roller — slow
Back ext. iso hold
Stage 2 — single leg holds, building toward 1 min each side
🧠 Home A — Stability (alternating)  ~15m
McGill curl-up
4 × 10 sec hold each side
Bird dog
3 × 10 each side, 10 sec holds
Dead bug
3 × 10 each side
Glute bridge
3 × 15, 2 sec hold
Side bridge
3 × 45s each side (or max hold)
🧘 Home B — Mobility (alternating)  ~21m
Cat-cow
2 × 10 slow
4-way hip mobility circuit
full circuit
Deep squat hold
3 × 50 sec
Loaded butterfly
2 × 45 sec
Hip flexor kick out
3 × 15 each side
Side bend progression
3 × 35 sec
Deep psoas hold
2 × 60 sec
Stage 8
Block 2 Benchmark
🏋️ ~30m   🏠 ~18m
← YOU ARE HERE
💬 Benchmark week. Can you hold a single-leg back extension for 30 seconds each side? Has your baseline pain score improved? Write it down. This is your Block 2 data point.
💪 Session A — Strength (alternating)  ~26m
Sled walk
5 min warm-up — heavier load
Reverse hyper
3 × 12 — bodyweight or light load
Sumo deadlift
3 × 6 — barbell, light
Hip thrust
3 × 10 — barbell moderate
Monster walk
3 × 10m forward and back — moderate band
Back ext. iso hold
Stage 2→3 — when single leg holds feel solid, begin mid-range pulses (8–10 reps)
🎯 Session B — Accessory (alternating)  ~30m
Sled walk
5 min warm-up — heavier load
Trap-3 raises
4 × 15 (band)
Banded row
4 × 15 (strong band)
Split squat
3 × 12 (loaded)
Standing banded abduction
3 × 20 each side — moderate band
Thoracic extension
2 × 8 over foam roller — slow
Back ext. iso hold
Stage 2→3 — when single leg holds feel solid, begin mid-range pulses (8–10 reps)
🧠 Home A — Stability (alternating)  ~15m
McGill curl-up
4 × 10 sec hold each side
Bird dog
3 × 10 each side, 10 sec holds
Dead bug
3 × 10 each side
Glute bridge
3 × 20, 2 sec hold
Side bridge
3 × 50s each side (or max hold)
🧘 Home B — Mobility (alternating)  ~18m
Cat-cow
2 × 10 slow
4-way hip mobility circuit
full circuit
Deep squat hold
3 × 60 sec
Loaded butterfly
3 × 45 sec
Hip flexor kick out
3 × 15 each side
Side bend progression
3 × 40 sec
🏆 Block 3
Performance & Integration
Stage 9
Compound Integration Begins
🏋️ ~26m   🏠 ~21m
← YOU ARE HERE
💬 Block 3 — Session A is now your heavy compound day. Session B maintains the accessory work that supports it. The split squat exits after this stage as the sumo deadlift takes over as the primary lower body compound movement.
💪 Session A — Strength (alternating)  ~26m
Sled walk
5 min warm-up — heavier load
Sumo deadlift
3 × 6 — barbell building load
Hip thrust
3 × 10 — moderate weight
Reverse hyper
3 × 12 — bodyweight or light load
Monster walk
3 × 10m forward and back — moderate band
Back ext. iso hold
Stage 3 — mid-range pulses, building toward 30 continuous reps
🎯 Session B — Accessory (alternating)  ~26m
Sled walk
5 min warm-up — heavier load
Trap-3 raises
3 × 12
Banded row
3 × 10 (heaviest band)
Split squat
3 × 10 (loaded)
Thoracic extension
2 × 8 over foam roller — slow
Back ext. iso hold
Stage 3 — mid-range pulses, building toward 30 continuous reps
🧠 Home A — Stability (alternating)  ~12m
McGill curl-up
4 × 10 sec hold each side
Bird dog
3 × 10 each side, 10 sec holds
Dead bug
3 × 10 each side
Side bridge
3 × 55s each side (or max hold)
🧘 Home B — Mobility (alternating)  ~21m
Cat-cow
2 × 10 slow
4-way hip mobility circuit
full circuit
Deep squat hold
3 × 60 sec
Loaded butterfly
3 × 50 sec
Hip flexor kick out
3 × 15 each side
Pigeon hold
3 × 45 sec each
Nerve floss
3 × 20
Stage 10
Building Compound Strength
🏋️ ~26m   🏠 ~21m
← YOU ARE HERE
💬 You are now training strength directly in compound patterns. Increase weight only if the previous session was comfortable. Session B carries the accessory and upper back work that balances the heavy loading in Session A.
💪 Session A — Strength (alternating)  ~26m
Sled walk
5 min warm-up — increase load
Sumo deadlift
4 × 6 (building load)
Hip thrust
3 × 12 — barbell, moderate weight
Reverse hyper
3 × 15 — add light load
Monster walk
3 × 15m forward and back — heavier band
Back ext. iso hold
Stage 4 — full range movement, building toward 30 continuous reps
🎯 Session B — Accessory (alternating)  ~26m
Sled walk
5 min warm-up — increase load
Trap-3 raises
3 × 12 (loaded)
Banded row
3 × 10 (heaviest band)
Thoracic extension
2 × 8 over foam roller — slow
Monster walk
3 × 15m forward and back — heavier band
Back ext. iso hold
Stage 4 — full range movement, building toward 30 continuous reps
🧠 Home A — Stability (alternating)  ~12m
McGill curl-up
4 × 10 sec hold each side
Bird dog
3 × 10 each side, 10 sec holds
Dead bug
3 × 10 each side
Side bridge
3 × 60s each side (or max hold)
🧘 Home B — Mobility (alternating)  ~21m
Cat-cow
2 × 10 slow
4-way hip mobility circuit
full circuit
Deep squat hold
4 × 60 sec
Loaded butterfly
3 × 60 sec
Hip flexor kick out
4 × 15 each side
Pigeon hold
3 × 50 sec
Nerve floss
3 × 20
Stage 11
Peak Load Stage
🏋️ ~26m   🏠 ~21m
← YOU ARE HERE
💬 This is the hardest training stage. Take full rest over the weekend. Your nervous system needs recovery before the final stage. Eat well, sleep well, walk. The adaptation happens in the rest.
💪 Session A — Strength (alternating)  ~26m
Sled walk
5 min warm-up — heaviest so far
Sumo deadlift
4 × 5 (heavy)
Hip thrust
3 × 8 — heavy
Reverse hyper
4 × 15 — moderate load
Monster walk
4 × 15m forward and back — heavy band
Back ext. iso hold
Stage 4→5 — when 30 full range reps feel strong, begin adding light weight (2.5–5 kg)
🎯 Session B — Accessory (alternating)  ~26m
Sled walk
5 min warm-up — heaviest so far
Trap-3 raises
3 × 12 (loaded)
Banded row
3 × 10 (heaviest band)
Thoracic extension
2 × 8 over foam roller — slow
Monster walk
4 × 15m forward and back — heavy band
Back ext. iso hold
Stage 4→5 — when 30 full range reps feel strong, begin adding light weight (2.5–5 kg)
🧠 Home A — Stability (alternating)  ~12m
McGill curl-up
4 × 10 sec hold each side
Bird dog
3 × 10 each side, 10 sec holds
Dead bug
3 × 10 each side
Side bridge
3 × 65s each side (or max hold)
🧘 Home B — Mobility (alternating)  ~21m
Cat-cow
2 × 10 slow
4-way hip mobility circuit
full circuit
Deep squat hold
4 × 60 sec
Loaded butterfly
4 × 60 sec
Hip flexor kick out
4 × 15 each side
Side bend progression
3 × 45 sec — max effort
Nerve floss
3 × 25
Stage 12
Final Assessment & Forward Plan
🏋️ ~26m   🏠 ~21m
← YOU ARE HERE
💬 Compare Stage 1 to Stage 12 across: baseline pain score, back extension capacity, sumo deadlift strength, and daily function. This is a lifestyle. The work continues — this is just the foundation.
💪 Session A — Strength (alternating)  ~26m
Sled walk
5 min warm-up — heaviest load
Sumo deadlift
4 × 5 (best weight)
Hip thrust
3 × 8 — best weight
Reverse hyper
4 × 15 — moderate load
Monster walk
4 × 15m forward and back — heavy band
Back ext. iso hold
Stage 5 — weighted reps, 3–5 × 10–15 at a challenging but comfortable load
🎯 Session B — Accessory (alternating)  ~26m
Sled walk
5 min warm-up — heaviest load
Trap-3 raises
3 × 12
Banded row
3 × 10 (heaviest band)
Thoracic extension
2 × 8 over foam roller — slow
Monster walk
4 × 15m forward and back — heavy band
Back ext. iso hold
Stage 5 — weighted reps, 3–5 × 10–15 at a challenging but comfortable load
🧠 Home A — Stability (alternating)  ~12m
McGill curl-up
4 × 10 sec hold each side
Bird dog
3 × 10 each side, 10 sec holds
Dead bug
3 × 10 each side
Side bridge
3 × 70s each side (or max hold)
🧘 Home B — Mobility (alternating)  ~21m
Full mobility — all exercises
full circuit
Deep squat hold
4 × 60 sec
Loaded butterfly
4 × 60 sec
Hip flexor kick out
4 × 15 each side
Side bend progression
max holds
Nerve floss
3 × 25
Reflect & document progress
compare to Stage 1
✓ Saved